Friday, May 30, 2014

Gruntz 15mm: Terran Marine Assault Mecha

 A Few years ago I was playing Warhammer 40k Actively and built these mecha to represent two different tanks in the Tau Army The Hammerhead and the Skyray. Since then I have used them for Gruntz 15mm as Assault class walkers. 


The Artemis is usually supported by Marine Assault Armor which can drop with it from orbit. 

The Artemis is heavily armed with a Large Railgun and two gatling cannons mounted on its arms. 

It has a decent move of 5 and jump jets That give it more options when maneuvering around difficult terrain.

The Railgun has been upgraded to give it better range. 

The Artemis is used my the Terran Marine Corps as a heavy support vehicle during orbital drop operations. Traditional vehicles have a difficult time making drops from orbit but mecha are able to land in and move from difficult terrain where a more traditional vehicle would be immobilized with track or suspension damage. 

The Artemis is a one man vehicle but the pilot is assisted with most tasks by an advanced AI.


I started with a Gundam Model I got at Hobbytown USA for $15.


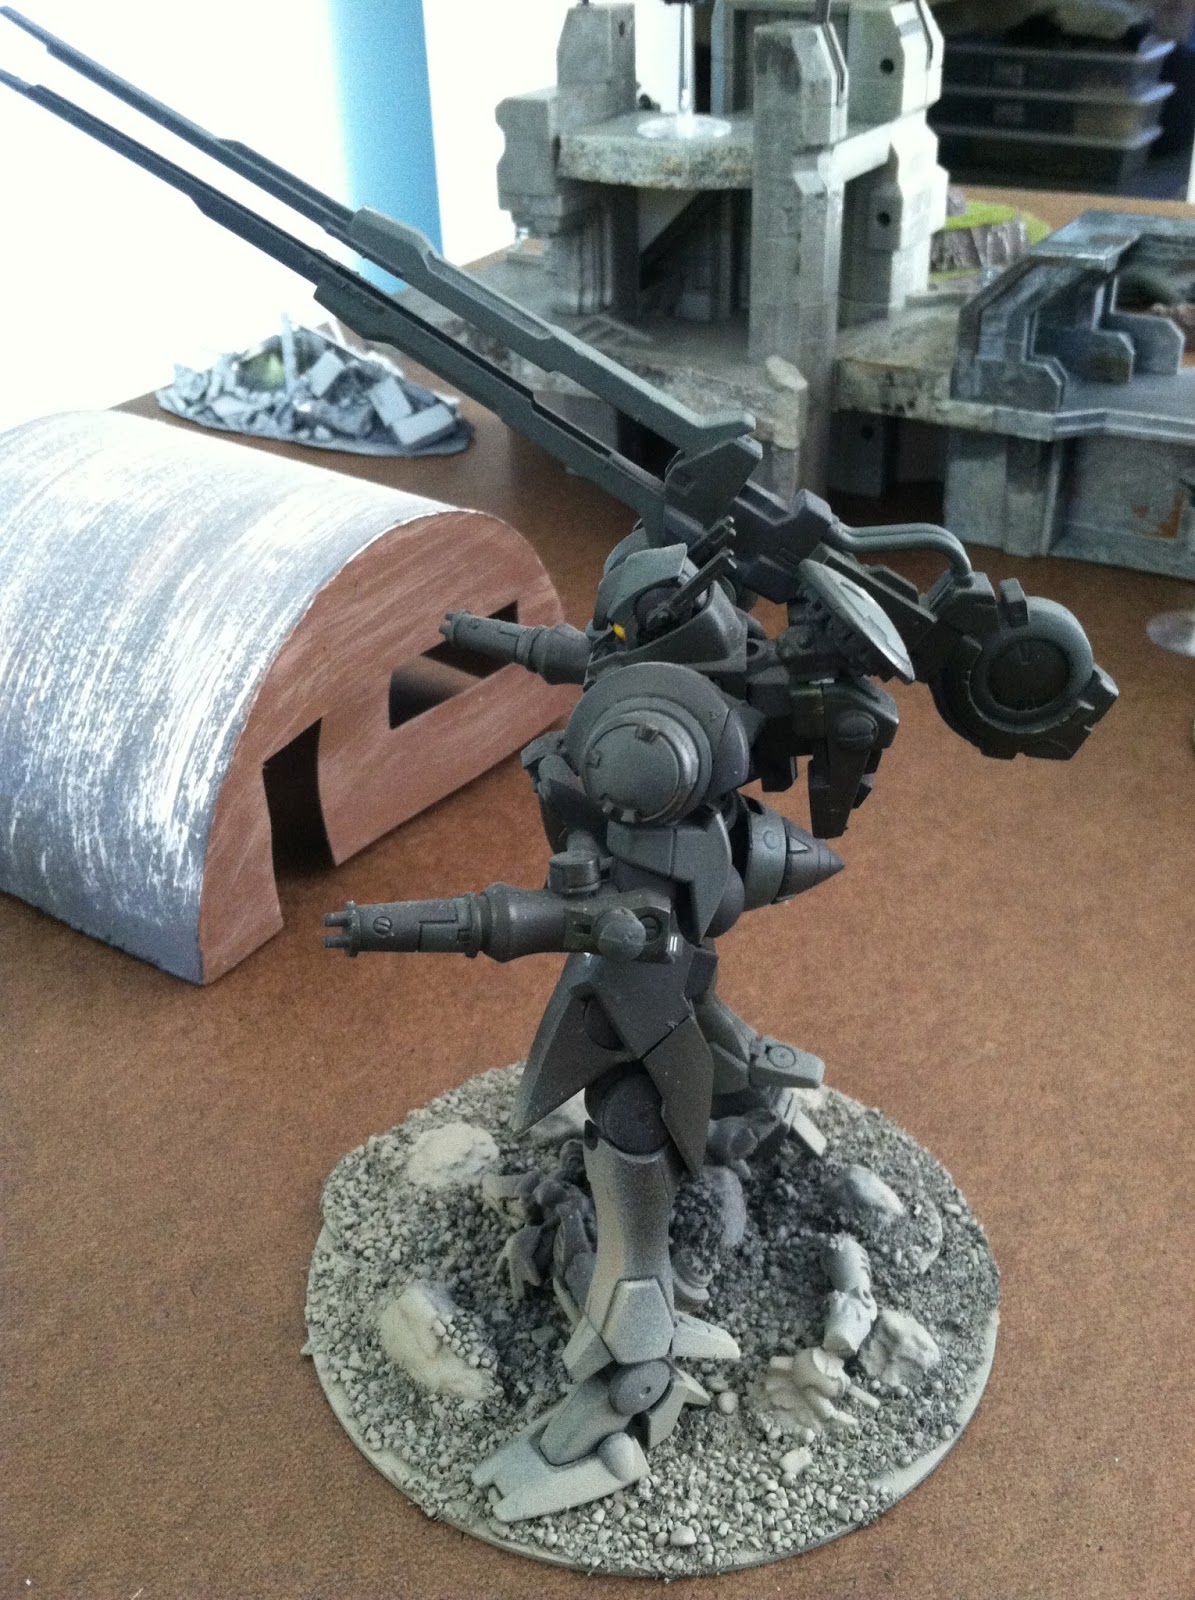
 I used some Tau parts and eliminated some of the Gundam parts. I added a Crisis Suit jet pack after shaving it down to fit flush along the back.I added the large shoulder rail-gun from another Gundam model the Tallgeese. Used burst cannons from Tau Stealthsuits for the gatling arms. 


Added a gun drone body on the shoulder of the jet-pack mounted on a multi-tracker with its antennae cut off. Added more target locks and burst cannon ammo drums as well as antennae to the ears.


I also added shield generators to the shoulders. All in all this is one of my favorite conversions and one of my favorite models. 


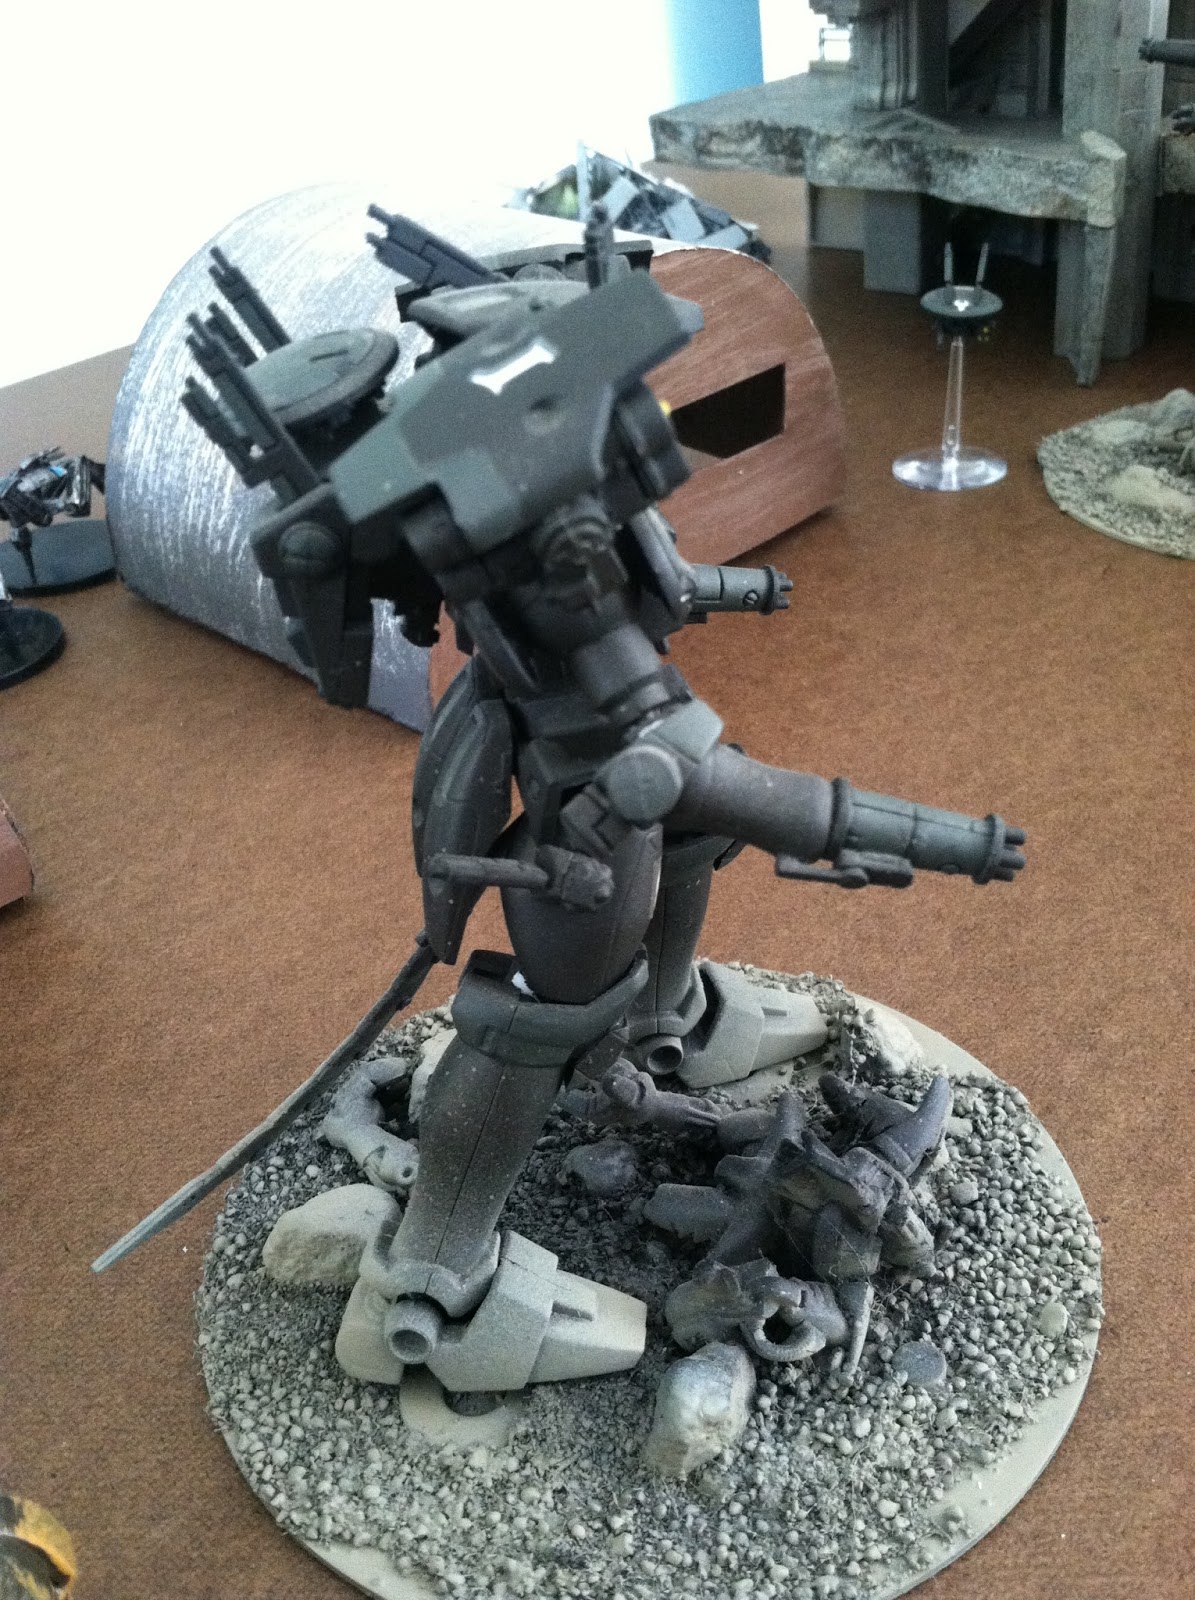
 I used the body of the Tallgeese from the earlier conversion to create the ....

Athena Assault Mecha. It is a heavy missile support mecha that fires from behind cover in an in-direct arc when a front line mecha like the Artemis designates a target.

It also carries two lighter but still effective gatling cannons in its arms similar to the Artemis. 

The Athena also carries a single pilot backed up by an AI assistant. It is also equipped with jump jets.


Similar to the Artemis mecha I used Tau stealth suit burst cannons, antennae and shield generators. I also used two Chaos Space Marine Havoc Launchers for the shoulder mounted missiles. I also added some extra armor plates to the top of the launchers. The head is made from a warhammer tank bit from an apocolypse vehicle sprue, a piece of gundam armor and some Tau antennaes.


Shoulder missile launchers with their additional armor. You can also see the Crisis Suit jet-pack mounted to the back in a similar fashion to the Artemis.


Another Gun Drone mounted on the Jet-pack to represent a radar dome. I also added a tail made from one of the Gundam model's whip. Foxy.


I mounted the mecha on CDs with some resin rocks I cast, sand and a torn up mech clix model lying face down. 


Here they both are shown with some Terran Assault armor, Combat Drone and Halo terrain in the background. 


You will see these guys soon in a Gruntz 15mm Battle Report but I thought I would throw some eye candy out there.

Thursday, May 29, 2014

Tournament Prep: Phantom Flight School

So I have been practicing with the Phantom maneuver dial in preparation for the tournament Saturday. In an earlier article someone brought up the question as to why I put Veteran Instincts on my Echo. The biggest reason other than firing first potentially is that I want to maneuver last. I want to see where all of the other ships have moved to so that I can decide if I want to boost or barrel roll when I decloak. 
Even with a one hard bank the maneuverability of the Phantom is astounding.


The reason you want higher pilot skill is that you need to decide where you are going to try an end up when you maneuver. In the above two photos you see the same maneuver, a boost to the left, but with a barrel roll to opposite sides. Event the final barrel roll will put you, or lack of one, can potentially land you in three different positions to attack a target. This could mean the difference in being in arc at range one but out of their fire arc completely which is ideal in this ship.


A right barrel roll with the two bank template opens up even more options as to where to go. Barrel roll or not barrel roll? If so which side. Depends on who you are trying to shoot. As I am looking at these maneuvers I am thinking that Outmaneuver would be a great EPS to put on this guy as it will be easy to get into positions where you are out of their firing arc and it lowers their agility which makes your 5 dice at range one even more effective.

Flip the 2 bank around and even with the same maneuver on your dial you are in a completely different position.

Granted against turrets all of this maneuvering is mostly pointless unless you shoot before them with a good chance to destroy them that turn or you are working the Outmaneuver angle to reduce those turreted ships who already have a low agility value to zero or almost zero. This will virtually guarantee a hit or two, especially at close range.

Even though the Phantom's dial has K-turns in it with Echo you should never have to lose an action just to turn around and face the other way. With the plethora of options granted by Echo's ability you can turn around and focus that turn or plant an evade token if you think someone has a shot at you. Because if they shoot first you will only have TWO agility dice to defend with, so you might need that evade.

One of the things that I am doing to practice is just to throw a bunch of ships and asteroids on the board at random and then trying to maneuver around them or to line up good shots. This gives me a better idea of where certain maneuvers are likely to land me and how much the mandatory bank / barrel roll is likely to throw my chosen dial maneuver off. If you wan to get better at anything you need to practice with it. One of the hardest things about the X-wing game is just freaking flying your ship around the board without bumping into you own dudes. That is something you don't necessarily need another player for.

Just get out there and practice drivin the goofy thing.

FUBAR 10mm Battle Report: Dustball TRAP Mission


Dustball was a small fight in the grand campaign to unite the Sol Sector but it was a brutal fight
inside the numerous mining stations. The single flaw in an otherwise great design was the
vulnerability of the Franks MBT in having its main weapon damaged and thereby taking the tank out
of the fight until the large powerful cannon could be replaced in a temporary depot. The Franks and
the Ghost mecha fought nasty long range duels on the wide open dunes of Dustball where the
powerful gun of the Franks could really shine. Persistent dust-storms made these long range duels a
rare occurrence though.
If it were not for the close air support provided by Scarab Dropships then the 13th may have lost
the Battle for Dustball. The 13th DropshipWing performed superbly and proved in some battles to be
the single best asset the 13th MLG had on Dustball. In one case a single Scarab, piloted by Captain
Darryl Rogers, accounted for no less than eight enemy mecha kills and numerous drone kills when he
was covering the retreat of Echo Company, 3rd Battalion after they managed to secure an enemy AI
core.
The AI core, code-named Judas, has proved to be a font of intel on Ghost intentions and
capabilities. Naval Intelligence managed to convince the AI to turn and has been working with Judas
to shorten the war with the Ghost worlds within the Sol Sector.


Echo Company, 13th Marine Landing Battalion, fights their way back to friendly lines. Ghost forces seem to boil out of the very ground and oppose them at every turn. During the long retreat back to the Space-head Echo company comes across a special forces unit whose Scarab dropship was shot down and the mecha were forced to eject and had hard landings during a dust storm. The pilots of the mecha and the Dropship survived the crash but the frequent dust storms are interfering with communications. Finally they get through to the retreating Echo company who diverts to pick them up.


The scarabs push forward to engage the Ghost forces but are overcome with accurate and concentrated fire. 


2nd platoon, Echo Company pushes forward to secure the down pilots waiting near their crippled dropship. 


1st Platoon, Echo Company pushes forward to secure the pilot. A brave scout sled driver flies forward and recovers the Mecha pilot from the wreckage of his crippled machine while the rest of the platoon engages Ghost forces in a fierce firefight all around them.


Third Platoon dismounts its infantry to push up the slope where the other mecha pilot awaits rescue. The rest of third platoon's forces cover them but take heavy fire from opposing Ghost forces.


A unit of Assault mecha and Heavy "Spider" mecha push forward and do tremendous damage to a heavily out-gunnned second platoon.


Despite heavy fire the Ghost forces armor shrugs off most of the railgun rounds fired at them. Their inexorable advance pushes forward slowly but steadily towards the downed dropships and the crippled special forces mecha. They eventually manage to secure the dropship as they force back second platoon with heavy casualties.


Ghost forces come close to securing one of the mecha pilots an his crippled ride. 1st platoon manages to secure the pilot and drive back the Ghost forces on the right flank. 

Aftermath:
The game ended up being a victory for the Terran troops despite horrendous casualties. They managed to rescue both mecha pilots but the fate of the Dropship crew is unknown. The last images of them showed them being pulled from the wreckage and transported off to an unknown destination.

Kevin had some amazing rolls and managed to kill off all of the Scarabs who pushed forward to engage the Ghost forces early on. I probably should have been less aggressive and pushed with my forces together but I wanted to try and pin or destroy some of the Ghost's supporting mecha early on. That didn't work out so well and lost all of my dropships support on the first two turns. After that it was a tough fight. The Franks is a good tank but hampered by its sole weapon, its main gun. Once the main gun has been put out of action the Franks is just moving terrain. I think we are going to have to field some combat engineers for field repairs of damaged tanks.

Wednesday, May 28, 2014

FUBAR 10mm Battle Report: The Battle of Kreul

Admiral Longbeach has detached the Marine Landing ships to take the lightly occupied world of G3045G6 aka. Dustball. It is a desert planet with a large icecap and low temperatures over the long nights. Duststorms frequent the world as the temperature differences between the sunny side of the world and the night side vary drastically and create huge winds and choking clouds of dust. The Ghost AIs have established numerous mining bases on this world and all of them need to be cleansed so that they cannot eventually rebuild their industrial base in this system. The system has to be completely scoured of all Ghost forces lest they threaten  our rear areas.
General John Amos III, Commanding General of the 13th Marine Landing Group, will lead the campaign on Dustball. Resistance is expected to be light but we all know how badly the secret squirrels can screw the pooch when it comes to enemy forces estimates. General Amos would also like to capture an enemy AI if at all possible but that company commanders should not unduly risk their forces in order to capture one. If the opportunity presents itself commanders should attempt to seize one and get it back to the spacehead for transport back to Earth.


Terran Alliance Special Forces, 3rd Kommandos,  have captured an AI but their transport was critically damaged and they are holed up in an abandoned desert clan hold. The 13th have dispatched Echo company to retrieve the Kommandos and return the package to the Terran spacehead. 


Marine Nighthawk scout powered armor drop onto the compound to reinforce the Kommandos while the ground rescue force pushes forward.


Two Franks MBTs escort two Terrapin APCs carrying two squads of Blackhawk power armored Marines. 


Two Franks class MBTs find a firing position to destroy a few Ghost mecha that are pushing the ground forces' flank.


A Franks is destroyed by plasma weaponry from Ghost Heavy Walkers while a Scarab gunship lays down suppressive fire and a Terrapin loaded with power armor pushes forward to retrieve the captured AI.


The Hammerhead variant of the Franks provides fire support and destroys a Heavy Walker with anti-tank missiles.


Ghost forces boil out of a hidden base near by and threaten to overwhelm the rescue force.


A scout sled pushes forward to spot for the Hammerheads firing indirectly.


Heavy walkers are destroyed but the swarm of light mecha push forward. 


Two scout sleds harass an Assault Walker and try to pierce its rear armor with their light rail-guns.


Marines unload on the swarm and destroy much of the leading edge of the light mecha swarm. The Kommando team loads onto a Terrapin and prepare to exfil the area.


The Marines of Echo company sell their lives dearly as the Kommandos secure the package.


Medium Mecha are destroyed and an Assault mecha had its weapons blown off but a survivor manages to down the brave command Scarab who managed to blunt the flanking attack along with a platoon of armor.


Marines take the brunt of a desperate Ghost push to recapture their AI node. While a metric butt ton of Ghost machines have been destroyed more seem to advance to fill the gaps in the never ending wave of murderous machines.


A Scarab Gunship loaded with hurt guards the Kommando's transport and their precious cargo.


The Scarab class gunship carries a lot a pain. Artillery grade aerial missile racks and twenty anti-tank guided missiles. The Scarab can also carry two Terrapins or Franks vehicles into orbit or land them onto a planet's surface.


Despite heavy losses to Echo company the package is safely escorted to the Marine Spacehead. A follow-up orbital kinetic strike from the Marine Landing Ship TAS Falluja destroys the hidden Ghost base and nearby ground forces.


The scenario and the background info are from my ongoing and very extensive campaign set in the Art of War gaming universe where a Synod of Worlds seeks to destroy what they consider dangerous life-forms, aka Human and others like us. The Earth unifies partially under the auspices of the Terran Alliance (NATO an other new allies) and uses new tech and discoveries provided by sympathetic aliens within the Synod. The Terran Alliance reaches out to nearby alien cultures who are also on the Synod's kill list. As the Alliance grows it gets stronger and manages to fight on a more and more even balance with the smaller but more advanced forces of the Synod. I will occasionally showcase more battle reports set within the universe on a number of scales from 10, 15 and 28mm ground force actions to spacefleet battles using Full Thrust and BOHICA space battles.

Tuesday, May 27, 2014

Assault on Imdaar Alpha: Tournament Prep: Finals Lists


The Assault on Imdaar Alpha pre-release event tournament requires that if you make it to the finals you must use two of the new ships in your finals squad build. So two of the new ships plus whatever you can add from your collection. And you must be ready to play a faction other than the one you brought. So essentially you need to be ready with both a Rebel and Imperial final build using the new ships and be ready to play them.

"But Matt," you say, "I will never make it to the finals, I suck."

and that may be true... It may also be true that others suck more than you on tournament day.

"Difficult to see. Always in motion is the Suckage." Yoda

That is a paraphrase, but you get the idea. It never hurts to be ready for a day full of WIN.

First lets look at the ships you have to take and the stuff they need, absolutely need to be effective. 

Imps
TIE Phantom - needs an advanced cloaking device. This is really a must have as it saves you an action and keeps the window of vulnerability small. Also with 4 attack and a crew slot, gunner is also an auto-include.

TIE Defender - This bad boy is tough and I am tempted to run Colonel Vessery with Vet Insticts to give him PS 8

Rebels
E-wing - I'm thinking Corran Horn with Determination and an R5 to make him tough as any E-wing will be a High Priority target and most of the guys will not be able to resist Corran's awesome ability to make two attacks in one turn.

Z-95 - Normally Lt. Blount would be an auto-inlcude but in the finals your Imperial Opponent will be hobbled with two very expensive ships and so the Swarm will most likely be small or non-existant. So either Cracken or one of the unnamed mooks with missiles and munitions failsafe as a support ship.

Here are a couple of lists I was considering:

The Flying Circus - IMPs
Darth Vader - Nekkid
Colonel Vessery - Vet Instincts
Echo - Vet Insticts and Adv Cloak

This list gives you a lot of high PS ships (8 or 9) and different abilities and capabilities. It is a lot to manage since they all have different characteristics and flight capabilities. It will also cause your opponent to suffer from "What the Hell do I shoot at first" syndrome. They are all aces and they are all dangerous. Good for maximum confusion.

Tour de France - IMPs
 Colonel Vessery - Vet Instincts
Echo - Vet Insticts, Gunner and Adv Cloak
Omicron Shuttle with Ion Cannon

This list makes Echo more dangerous by adding the gunner re-roll on that sweet, juicy 4 attack. The shuttle tries to neutralize dangerous small ships like Corran or Ethan the Bat by Ionizing them and escorting them off the board while the Colonel and his echo rape the rest.

Antiques Roadshow - Rebels
Corran Horn, R5, Determination
Bandit Squad, Concussion missiles and munitions failsafe
Gold Y-wing with Ion Turret

 Usually in antiques roadshow you have the announcer showing a bunch of random junk that turns out is worth a lot. That's what we have here. The Y-wings bring a lot of health and can neutralize the high cost Imp ships you opponent has to bring. Once they are Ioned then escort them off the board or finish them off. The Z-95 supports from the rear with missiles and later with guns. Corran goes full retard and kills off the most dangerous enemy on the other side with his double nut punch.

The Unicorn Airshow - Rebels
Corran Horn, Adv Sensors, Swarm Tactics
Bandit Squad, Cluster missiles
Rookie X-wing
Roark Garnet with Blaster Turret

What do you see at an airshow? A bunch of old ships for the crowd to eeewww and ahhhh over and one state of the art ship to WOW the crowd. Garnet bumps the rookie to PS12 and lets him loose. Corran swarms with the Bandit Z-95 and then they both go full freakin retard on anything that gets in their way, till its  dead. Once the Z-95 has blown its cluster wad then the Rookie and Bandit switch places while Roark chills in the back poking things with his turret.

Assault on Imdaar Alpha Tournament Prep: List Building


Over Memorial Day weekend I have had the chance to think about what builds I want to field for the tournament this weekend at the Wyvern's Tale. They have to have some basic components first:

Health Points: should be over 20 but preferably closer to 30

Attack Dice: More than 10 (nine plus gunner/s count)

Pilot Skill: no noobs is good news, at least PS of 4 or more.

Special Sauce: Ability to spread damage around or ignore crits or both

So here are some of the lists I have come up with in no particular order:

Rebels
Wookie 360 - 100 points
Chewie, gunner, recon dude, draw their fire, rollin in the Falcon
Grey Squad Wishbone with Blaster Turret

This list has three turrets and a crap ton of health. It focus fires, Chewies draws crits, and doesn't do any fancy maneuvering. It rolls slow and chews through whatever it hits. Chewie can focus on both his first attack and gunner re-roll making him a beast in a knife fight. The Wishbones finish off or soften up anything Chewie doesn't kill outright.

A modification of this list ditches Recon Dude and Falcon title for R5s on the Wishbones and Anti-Pursuit Lasers on Chewie. Potentially more durability at the expense of Chewies attack.

We Shoot First - 100 Points
Wedge, R2, Swarm Tactics
Roark Garnet, Blaster Turret, Recon Dude
Rookie X-wing
Rookie X-wing

This list lets one shooting at PS 12 and two at PS 9 or two at PS 12. This list has a lot of firepower, a turret and the ability to kill your opponent's ships before they can fire back. Roark sits back and boosts whomever an lets Wedge and his two wing-men do all the heavy lifting. Roark is not completely useless in a fight as his tirret gives him a 360 fire arc at range 2 and with two focus (one to fire and one to modify) he could be just as deadly as the X-wings.

Empire
The Kagi Block - 100 points
Captain Kagi, Rebel Captive, Sensor Jammer, Engine Upgrade
Mauler
Backstabber
Dark Curse
Obsidian Squad

You have four independent TIE pilots which could throw someone off their game when you don't run them in formation or keep them in formation after the first pass. Kagi force your opponent to target lock him if he is in range. If they shoot at him they take a stress and the jammer makes it more difficult since the higher PS TIE pilots have hopefully stripped some focus tokens off of the guys shooting at the shuttle.

Hunter's Curse 99 points
Bounty Hunter, gunner, anti-pursuit lasers
Dark Curse, Stealth Device

This list gives you two beefy muscle ships for the heavy lifting. The attack 3 gunner re-roll is deadly and APLs make running into them painful. Their large base and low PS makes it likely that someone will run into them and free damage is free damage. It will also force choices  since many people will be unwilling to risk running into them and so might make mistakes. Dark Curse flies around being annoyingly hard to hit while finishing off low health ships and low agility ships.

Monday, May 26, 2014

Raiders of the Crashed TIE


So, when we last left our heroes they had been forced down to the planet's surface and crash landed. The Crimson Ghost is damaged and in need of parts. The crew investigates the nearby crash of one of the Corporate Sector TIE fighters that they had shot down. The crashes have drawn the attention of a nearby raiding party of Desert Raiders. The boys have left the ship in the hands of their astromech droid Casper, an R5 series droid, who is repairing some of the damaged systems.  


The boys are just dismounting from their speeder bikes when the raiders show up. A few of the raiders stay with their Bantha mounts and fire at the boys with their homemade blaster rifles.


Dodger and Dale run for the cover of a piece of wreckage while Hammer tries to reach another piece of wreckage closer to the attackers. The boys have quick reflexes and manage to concentrate fire to down one of the raiders. Rifle fire from the Banthas forces Hammer to hit the dirt and crawl forward to cover.


Safely in cover, the boys concentrate fire and bring down another raider as they charge forward to get into hand to hand with their gaffi sticks. Hammer fires from the prone position and is feeling very exposed as a raider charges his position.


Dodger and Dale burn down the Raider who was charging Hammer who regains his feet and wounds another Raider. The boys manage to force the Raiders into cover with accurate blaster fire.


Fire from the Banthas manage to pin the boys behind cover while the other Raiders charge into hand to hand. Dodger is wounded when a raider hits him in his side with a Gaffi stick but all the boys manage to finish off the Raider Dervishes. With their comrades out of action the Bantha riders hurry off and make their escape.

The boys manage to secure some of the parts they need to repair the ship but not all of them. When they return to the ship they find the nearest settlement where they might be able to find some parts they need.

Next Week: A Night in Mos Terribad